Sunday, 22 April 2012

Add A Fixed Floating Image To Your Blog


A floating image is an image that will always appear in the corner of your blog even when you scroll up and down the page.In this post i will show you how you can add a fixed floating image to your blog.The image will also be a hyperlink so people can click it and go you any page you want.You may wish to have an Rss Icon for your feed or a link back to your blogs home page.


Add Fixed Image To Your Blog

1.In your Blogger dashboard Click Design > Edit Html > Tick The Expand Widget Templates Box.


2.Find the following piece of code in the html:


]]></b:skin>


3. Copy And Paste the following code directly Below / Under ]]></b:skin>

#float_corner {
position:fixed;_position:absolute;bottom:0px;left:0px;clip:
inherit;_top:expression(document.documentElement.scrollTop+document.documentElement.clientHeight-this.clientHeight);_left:expression(document.documentElement.scrollLeft + document.documentElement.clientWidth - offsetWidth);}

Note - You can change the following attributes bottom :left to place the image in different corners :

top left
top right
bottom left
bottom right

4.Find the following code in your blogs html :

</body>


5. Copy And Paste the following code directly Above </body>


<div id="float_corner">
<a href="ENTER TARGET URL HERE">
<img src="ENTER IMAGE URL HERE" border="0" /></a>
</div>


Note - You Must change the following attributes :


ENTER TARGET URL HERE - Place the address you wist the image to lead to when clicked here.


Example: http://www.spiceupyourblog.com/


ENTER IMAGE URL HERE - Place the URL of the image you want to use here.


Example : http://i941.photobucket.com/albums/ad259/spiceupyourblog/info.jpg


Add A Second Floating Image To Your Blog

If you want to have a second image you will first of course have it in a different corner but you must also slightly change the code.In steps 3 and 5 change float_corner to float_corner1 for a third image you would use float_corner3 and so on.

How To Show Widgets Only In Homepage Or In Any Particular Page


Once you add any widget, in your blog, it will be displayed in all the pages by default, including your homepage.
But sometimes, we do want to show some widgets only on Homepage or only for the individual posts pages, or only in a specific page, the coding is quite simple, but you need to customize the widget through the "Edit HTML" link in your "Layout" section.


Follow these steps:
Create any widget, and place it where-ever you want, and save the template. Check if it is working (should be displayed in all the pages). Remember to give a TITLE to it, like Archives/BlogRoll/Maps/Clock, anything unique.


Now go to "Edit HTML" page.
Click/mark "Expand Widget Templates"
Then find for that unique Title (by searching through CTRL+F method)
It will be something like this:

<b:widget id='HTML3' locked='false' title='UNIQUE WORD OR TITLE HERE' type='HTML'>
<b:includable id='main'>
<!-- only display title if it's non-empty -->
<b:if cond='data:title != &quot;&quot;'>
<h2 class='title'><data:title/></h2>
</b:if>
<div class='widget-content'>
<data:content/>
</div>

<b:include name='quickedit'/>
</b:includable>
</b:widget>

Now tweak this as follows

Tip #1
To SHOW the code/widget only in HomePage

<b:widget id='HTML3' locked='false' title='UNIQUE WORD OR TITLE HERE' type='HTML'>
<b:includable id='main'>

<b:if cond='data:blog.url == data:blog.homepageUrl'>
<!-- only display title if it's non-empty -->
<b:if cond='data:title != &quot;&quot;'>
<h2 class='title'><data:title/></h2>
</b:if>
<div class='widget-content'>
<data:content/>
</div>

<b:include name='quickedit'/>

</b:if>
</b:includable>
</b:widget>

Tip #2
To SHOW the widget in "All Posts", but NOT in HomePage

<b:widget id='HTML3' locked='false' title='UNIQUE WORD OR TITLE HERE' type='HTML'>
<b:includable id='main'>

<b:if cond='data:blog.pageType == "item"'>
<!-- only display title if it's non-empty -->
<b:if cond='data:title != &quot;&quot;'>
<h2 class='title'><data:title/></h2>
</b:if>
<div class='widget-content'>
<data:content/>
</div>

<b:include name='quickedit'/>

</b:if>
</b:includable>
</b:widget>

Tip #3
To SHOW the widget in any particular page

<b:widget id='HTML3' locked='false' title='UNIQUE WORD OR TITLE HERE' type='HTML'>
<b:includable id='main'>

<b:if cond='data:blog.url == "SPECIFIC_BLOG_POST_URL"'>
<!-- only display title if it's non-empty -->
<b:if cond='data:title != &quot;&quot;'>
<h2 class='title'><data:title/></h2>
</b:if>
<div class='widget-content'>
<data:content/>
</div>

<b:include name='quickedit'/>

</b:if>
</b:includable>
</b:widget>
Add those code lines in red color, as per your requirement.

Tip #4
To HIDE a widget ONLY in a particular page/post, and to display it in all other pages of your blog, use this code (shown below is only the code in RED from the previous code):

...
...

<b:if cond='data:blog.url != "SPECIFIC_BLOG_POST_URL"'>
...
...
...

</b:if>
...
...

Tip #5
To SHOW widgets only in Archive Pages

...
...

<b:if cond='data:blog.pageType == "archive"'>
...
...
...

</b:if>
...
...

Tip #6
To SHOW widgets only in Static Pages

...
...

<b:if cond='data:blog.pageType == "static_page"'>
...
...
...

</b:if>
...
...

Tip #7
To HIDE widgets in Static Pages

...
...

<b:if cond='data:blog.pageType != "static_page"'>
...
...
...

</b:if>
...
...


How To Post Status Updates In Blue Colour On Facebook

Today we are again back with another amazing trick for posting Blue text messages on Facebook wall or commenting with your message in Blue Color. Well so when ever person will click on the status he will be taken to his own profile. So just check out the steps below and have fun.


Steps for Posting Blue Status on Facebook :


1. Go to Facebook.com and Login with your Credentials.


2. Now go to update status link and paste below code, and change the text saying YOUR TEXT HERE with your own text you want in blue color like.


@[1: ]@@[1:[0:1: Your Text Here ]]

3. Now after you have done writing your text click on Post and Voila ! you will have your status in Blue Color which is dam ! awesome.


4. So isn’t this amazing trick to make text Blue in color so enjoy impressing your friends on Facebook and do share this trick if they ask you how its done.

Awesome New Smiley And Emotional Codes List for Facebook


Smileys are the best way to express your mood, or what you are feeling right now without typing anything but by just showing a nice emoticon that expresses everything, well we have already posted many stuff on Facebook like and these new codes join that awesome list so check image on the right demonstrating some emoticons I just messaged to my dear friend.


So I just grabbed all the codes and messaged to check if every emoticon was working or not and well yes every emoticon is working and is also rich in color and contrast so you will simply love using them.


How to use these on Facebook :
So now if you like emoticons demonstrated in the image above than you should check all the codes below for using them. Now just copy any code you like and paste them in your chat than click on Enter and your emoticon will be displayed.


[[f9.laugh]]
[[f9.sad]]
[[f9.angry]]
[[f9.sleepy]]
[[f9.shock]]
[[f9.kiss]]
[[f9.inlove]]
[[f9.pizza]]
[[f9.coffee]]
[[f9.rain]]
[[f9.bomb]]
[[f9.sun]]
[[f9.heart]]
[[f9.heartbreak]]
[[f9.doctor]]
[[f9.ghost]]
[[f9.brb]]
[[f9.wine]]
[[f9.gift]]
[[f9.adore]]
[[f9.angel]]
[[f9.baloons]]
[[f9.bowl]]
[[f9.cake]]
[[f9.callme]]
[[f9.clap]]
[[f9.confused]]
[[f9.curllip]]
[[f9.devilface]]
[[f9.lying]]
[[f9.rofl]]
[[f9.billiard]]
[[f9.cakepiece]]
[[f9.rosedown]]
[[f9.shutmouth]]
[[f9.shy]]
[[f9.silly]]
[[f9.tongue1]]
[[f9.fastfood]]
[[f9.ring]]
[[f9.plate]]
[[f9.candle]]
[[f9.party]]


[[389448181885]]    – Week
[[126229700722316]] – Pikachu
[[126230880722198]] – Green Worm Ani
[[126216480723638]] – butterfly blue
[[394930959230]]    – Smileys Zzzz
i ♥ u

So now just try using them on Facebook and enjoy with your friends and family members hope these emoticons entertain all your buddies do share this post with all of them so that they can also enjoy :)

Remove Write Protection on USB Drive & Memory Cards


Many times using your portable devices you get errors like the disk is write protected like in the image on the right hand side. So this can happen anytime due to virus attacks or anything can be the cause. So recently I got main from one of my reader namedsoundararajan so he was asking that his 2GB card has become write protected so what he can do, well there are two ways you can try to remove its write protection so check them below.
Firstly I will recommend checking for any physical lock on that card or USB, because many times company’s provide a lock write attached to the card for making it write protected, so check that up make sure its off and than also if you are not able to copy stuff to your card than follow below methods.

Removing Write Protection Using Registry Editor :

Well this is most preferred way of removing write protection as it does not include any formatting of disk or memory card. So you just have to manipulate a .reg key and that’s it.
1. Open Registry Editor by navigating to Star Menu > Run ( on windows 7 search for Run in start Menu ) now type “regedit” and you will see your Registry Editor opened.
2. Now Navigate to the following path :
HKEY_LOCAL_MACHINE\SYSTEM\CurrentControlSet\Control\StorageDevicePolicies
Now if you are not able to see the StorageDevicePolicies than no problem just download this.Reg File and double click on it, now restart your computer and you will have Storage DevicePolicies.
3. Now double click on the WriteProtect and make its value 0 and than click OK.
4. Now just close registry editor and restart your computer for changes to take effect, now plug your memory card or USB in and enjoy non write protected memory card.

Removing Write Protection Using Apacer Formatting Utility :

Now if you are not able to remove write protection from your Memory Cards or USB Drives using the above method than you can go for Apacer Formatting method which simply works quit good.
Now this method needs your card or USB Drive to be formatted so make sure that you have copied all the data from your USB Drive to your computer, now follow steps from below and have fun.
1. Download Apacer Formatting Utility to your computer, make sure its not kept inside the USB Drive just keep it anywhere outside where you can remember.
2. Now extract it and than plug your pen drive or memory card in to your computer and than double click on the Start.bat file present inside the folder you just downloaded. Now this step will start formatting your drive or card so let it do its work till you figure out that formatting is done.

5 Things Yahoo! Search Can Do But Not Google


Google is the world’s favorite web search engine but there are a couple of cool things that you can do only in Yahoo!. Take a look:
1. Compose emails from the Yahoo! search box.
Type !mail abc@xyz.com in the Yahoo! search box and it will automatically compose a new email message for you in Yahoo! mail.
2. Get Lyrics of any song or your favorite artist.
Type madonna lyrics (for lyrics of Madonna songs) ormadonna material girl lyrics (for lyrics of a particular song)
3. Specifiy the order of search keywords in queries
Say you want only web pages where word x comes before y but not vice versa, then just put the search query in Square Brackets. An example:
[Sylvester Stallone] – will only return web pages where the word Sylvester appear before Stallone.
4. Search your favorite websites from Yahoo! itself.
For instance, type !wiki google in Yahoo! search box to search Google in Wikipedia.com. Other popular shortcuts are !ebay, !amazon, and !flickr. You can also execute these from the Firefox search box without changing the default search engine.
5. linkdomain – An undocumented Yahoo Web search operator.
A quick question – Can you find the number of articles on Wikipedia website that link to CNN.com ? It’s almost impossible to get this data from Google but you can do so quite easily in Yahoo! with the incredibly useful linkdomain operator. The answer is:
linkdomain:cnn.com site:wikipedia.org
yahoo linkdomain search
Or take another example – How many stories on TechCrunch actually link to the PayPerPost, Arrington’s favorite topic. The answer here is:
site:techcrunch.com linkdomain:payperpost.com
Credts: Amit Agarwal (Labnol.org)

Make Windows XP Boot-Up Faster With A Quick Registry Tweak


Let’s get straight to the point. This Windows XP registry tweak will make your system boot much faster. How much?


I can not say exactly how much faster, since it all depends on your computer specifications (processor, RAM, hard-drive and stuff like that…), but from my experience, this tweak decreased the time to boot-up for about 9-10 seconds.


Now you see how great this registry tweak is and it will get even better when you see how simple it is to apply. I will do my best to show you step-by-step and make it plain simple and of course with screenshots included.


How to make Windows XP start faster:

1. Click on “Start” on the taskbar.


2. Click “Run” located in the start menu.


3. Then in the “Run” panel, type: “regedit” without the quotation marks. (that will open up the Windows registry editor)


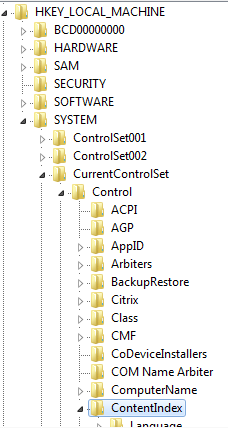
4. Then click on “HKEY_LOCAL_MACHINE” and expand it.


5. Then click on “SYSTEM” and expand it.


6. Then scroll down, and expand “CurrentControlSet”.


7. Under that, expand “Control”.


8. Then, under that one, locate and click on “ContentIndex”. (so when you click on it, it needs to be highlighted and it’s options need to show up in the right panel of Windows XP Registry Editor)


So to sum up, here’s where you need to navigate to:


HKEY_LOCAL_MACHINE \ SYSTEM \ CurrentControlSet \ Control \ ContentIndex


Let’s continue… You have just 6 more steps until the finish line!


9. When you have clicked on “ContentIndex” and it is highlighted and you see the options and parameters on the right side of the panel… Among those, you need to scroll all the way to the bottom and find the Registry key named “StartupDelay”.


10. Double-click on it and a new window panel will pop-up.


12. The new window has a field to enter value (and a default value entered already). But before you change the value, you need to change the base from Hexadecimal to Decimal. 


Take a look at the screenshot below to see what I am talking about:


Now when you change it to Decimal, it displays a different value (480000 instead of 75300).


13. So now, all you need to do is change the value from “480000” to “40000” (forty thousand)


Many people ask me if they can change it to an even smaller value than 40000, but I would not recommend doing that. I tested it and it doesn’t work. I did not feel any difference in boot-up time when I change it to value less than 40000 (and no, you can’t put 0 either).


14. After you’ve completed all the steps above, click “OK” and close the Registry Editor.
And one just one little thing you need to do to finish all this registry tweaking…


15. Restart your computer.


Now you can notice big difference in time that your system takes to boot-up. Mine was faster for 10 seconds than usual. How much faster does your Windows XP boot now? Share in the comments below!